Tuesday 6 November 2012

Installing Exchange 2013 UM Language Packs

 
Following on from my previous article on Exchange 2013 UM integration with Lync, I said I would blog on how to install the language packs. This hasn’t really changed at all from Exchange 2010.
 
To download available UM language packs for Exchange 2013 see here.
 
To see my previous blog on installing and removing language packs for Exchange 2010 Unified Messaging see here.


Browse to the BIN directory to confirm setup.exe is present
 
 
In a command prompt move to the BIN directory
 
 
Run the following command:


It will then open a new window and begin installation:
 
Please hold.
Hold a little longer.
 
All done! Once completed the window will close.
 
 
If we now open up the EAC and browse to | Unified Messaging | Dial Plans | Properties of Dial Plan | Settings |  we should now see the additional language pack available:
 
 
Set your required default.

 
To perform the same action in Powershell we would perform: Set-UMDialPlan –Identity ‘DialPlan’ –DefaultLanguage ‘languagepack’ In my example below it is en-GB
 
 
Ensure the Language pack is installed on all Back End servers that are in the Dial Plan. It doesn’t need to be installed on your Front End servers.
 
That’s it!

I'll look to write a PS script to automate this across Back Ends and Dial Plans - stay tuned.

Take care,
 
Oliver Moazzezi - MVP Exchange Server


Configuring Exchange 2013 Unified Messaging for Lync 2010 Voicemail access

 
Following on from my Exchange 2013 OWA and Lync IM integration guide I thought I’d turn my attention to the Exchange 2013 UM service and Lync integrated voicemail. For my previous blog post see here.


Exchange 2013 has split the UM service across both the Front End and Back End roles. In the following blog I have the roles split – but if you have the roles co-located you still need to perform each step.
 
Whilst the Back End officially has the UM role as part of it’s colocation of all role services (Mailbox, Client Access, Hub Transport and Unified Messaging), the Front End actually has a UM service called the UM Call Router Service. This is effectively a proxy for UM calls to the Back End servers. For a full breakdown of Exchange 2013 Unified Messaging take a look at the TechNet article “What’s New for Unified Messaging in Exchange 2013” located here.
 
On top of the new UM service and the breakout of services between the Front End and Back End servers, some of the commands have also changed from Exchange 2010.

                Running Get-UmServer on Exchange 2013 no longer works
               
 
Firstly note that Get-UMServer has been depreciated. It has been superceeded by Get-UMService and there is a new set of commands for the UM Call Router service. In fact take a look at the updated parameters and new cmdlets here.
 
So as promised here’s a guide on setting it up from start to finish on setting this absolutely wonderful feature between Lync and Exchange up.


      1. Create a Dial Plan. This can be created in the EAC (Exchange Admin Center) but is performed in Powershell here. Note: it still appears to be a requirement to have your Exchange UM Dialplan names matching any Lync Dialplans you have created.

      New-UMDialPlan –Name ‘Name’ – URIType SipName –Numberofdigitsinextension ‘x’ –countryorregioncode ‘xx’ –AccessTelephoneNumbers +00123456789


      2. We assign UM servers using the ‘Set-UMservice’ cmdlet

      Set-UMService –identity ‘SERVER’ –DialPlans ‘Plan Name’


      Perform this for the rest of your Back End servers that require to be in this Dial Plan. If you have created the Dial Plan in EAC and not used Powershell as I have, you will have to click on the Servers in the EAC and then specify Unified Messaging to add them to a Dial Plan.

      3.  We now need to set the UM Service Startup mode to either ‘dual’ or ‘tls’. This can be performed in the EAC or Powershell. We need to ensure each Back End Server has a certificate that can be used to secure the service. Please see my last blog post here for setting this up.

      In Powershell set the startup mode using Set-UMService.

      Set-UmService –Identity ‘SERVER’ –UMStartUpMode ‘dual _or_ tls’


      Again note the need for the certificate. Perform this action on all required Back End servers. As a side note I did say you can do this within EAC. Login and go to:

      Servers | Your Server | Unified Messaging | Set the ‘UM startup mode’:


      4.  We now need to ensure the certificate for the UM service has been assigned to the UM service.

      Enable-ExchangeCertificate –thumbprint ‘thumbprint’ –services UM


      Repeat this for all Back End servers. If you do not set the certificate for UM then the UM service will be in a constant state of restarting when proceeding to the next step.


      5.  We need to know restart the UM service, again do this for all Back End servers that we have configured in steps 3 and 4. You can restart the Microsoft Exchange Unified Messaging service in Services under Server Manager or use Powershell. Note if using Powershell you will have to be running a ‘run as Administrator’ session or this will not work.

      Restart-Service –msExchangeUM


      6.  We also need to assign certificates to the UM Call Router service that is on the Front Ends.

      Enable-ExchangeCertificate –Server ‘SERVER’ –thumbprint ‘thumbprint’ –services umcallrouter


      This one threw me originally as I kept trying to enable it for UM – and that kept failing, until I realised through the help of the ECP that it has been renamed for the FE role. Be aware that you can assign the cert for a Front End for the UM Call Router Service in the ECP.


      7.  Restart the service, again you can use Restart-Service, however the service name on the FE is msExchangeUMCR. So:

     Restart-Service msExchangeUMCR


      8.  Finally we need to add the Front Ends to the Dial Plan also. This is done using the Set-UMCallRouterSettings cmdlet – different to how we have done it above for the Back Ends.

      Set-UMCallRouterSettings –server ‘SERVER’ –DialPlans ‘DialPlan’


      Ensure this process is completed for all Front Ends.
 
      It is absolutely imperitive that you add Front Ends that hold the UM Call Router service to the Dial Plans otherwise UM will not work. This is the proxy service that routes the calls to the Back Ends.
 
      Also be aware that there is absolutely no way to do this in the ECP that I could see, so this must be performed in Powershell.

 
      9.  We now need to run exchucutil.ps1 which is in the scripts directory in the Exchange 2013 install path. Run it from a Back End server.


      Run it within the Exchange Management Shell .\ExchUCUtil.ps1 it should complete successfully.


      10.  We now need to run OCSUMUtil.exe, this is in the script support folder on a Lync server within “\Common Files\Microsoft Lync Server 2010\”


     Once it has loaded click on the Dial Plans and then click on ‘Add’, this will create a contact as shown:


      Ensure the number is correct and matches the number you entered for the Exchange UM Dial Plan in step 1. Repeat this process for each Dial Plan you want to merge. Also be aware that should you ever add new Dial Plans or UM Servers repeat steps 9 and 10 to configure them with Lync.


      That’s it! Configuration is completed and voicemail integration between Lync 2010 and Exchange 2013 UM should be working.

As you can see it is wildy different in setting up UM on both the Front End and Back End servers, but the process does share some similarities with Exchange 2010. We still need to set the UM service to dual mode or TLS and assign a certificate, the Unified Messaging role has to be a member of a Dial Plan and we still need to run ExchUCUtil.ps1 and OcsUMUtil.exe
 

In a further blog post coming this week I’ll move on to adding Language Packs for Exchange 2013 Unified Messaging. In the mean time you can download them here.

Take care,
 
 Oliver Moazzezi - MVP Exchange Server


Tuesday 30 October 2012

Lync 2010 and 2013 IM integration into Exchange 2013 OWA

IM integration was a great feature in Exchange 2010 and is followed through into Exchange 2013.
 
The steps have changed slightly however and the current TechNet documentation isn’t _that_ clear. So I thought I’d write it up. You'll find the TechNet article here, and I hope you agree my blog is more informative.
 
Exchange 2013 has two roles. The Front End proxy, and the Back End. The Back End co-locates all roles which are: Mailbox, Client Access, Hub Transport and Unified Messaging.
 
In Exchange 2010 you configured the IM integration entirely on the server that had the Client Access role. This could be a standalone server all co-located role server depending on the infrastructure needed. This was a config file at Exchange 2010 RTM and later moved to Powershell and settings on OWA virtual directories with SP1+.
 
In Exchange 2013 configuration is necessary on both the Front End and Back End roles. Again this can be co-located or standalone. I will treat them as separated for ease of understanding here.
 
 
Exchange 2013 Front Ends
 
1.    Perform in Powershell “Get-OWAVirtualDirectory”, you can use “Get-OWAVirtualDirectory –identity “Exchange2013FrontEnd\owa (default web site)” |select inst*” to immediately get the necessary information.


 2.  You will, if familiar with IM integration in Exchange 2010, be immediately at home here. However for IM integration in Exchange 2013 we only set two of the above four values. The values are ‘InstantMessagingEnabled’ and ‘InstantMessagingType’. We leave both ‘InstantMessagingCertificateThumbprint’ and ‘InstantMessagingServerName’ blank. This is very important as it actually does break the integration between Lync 2010 and Exchange 2013.

      We can set these values with the following command:
  
       3.      “Set-OwaVirtualDirectory –identity “Exchange2013FrontEnd\owa (default web site)” –InstantMessagingEnabled $true –InstantMessagingType OCS”
 
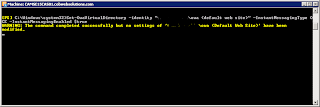
(Ignore the yellow text in my example below – I’m running the command to show you but as I’ve already set these attributes it’s telling me no settings have been modified)


       4. Perform the above command against ALL your Exchange 2013 Front End servers in your       associated sites that need IM integration.


      Exchange 2013 Back ends


      5.   Once this has been set we need to configure certificates. But the certificate configuration is on our Back End Exchange 2013 Servers. Browse to your Back End Servers and generate a new Certificate using New-ExchangeCertificate against the internal CA that Lync uses. I recommend this TechNet article for Cert creation: http://technet.microsoft.com/en-us/library/aa998327.aspx
 
Use the following two commands:
 
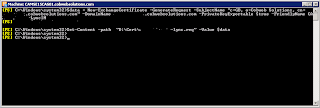
$Data = New-ExchangeCertificate –GenerateRequest –SubjectName “details here, use server FQDN as CN” –DomainName “FQDN of server” –PrivateKeyExportable $true –FriendlyName “Desired Cert Name”

Then:

Set-Content –Path “x:\your desired location” –Value $Data


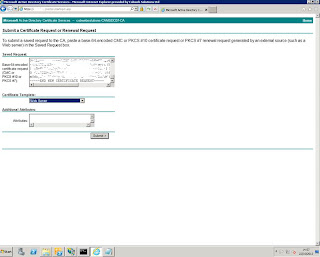
      6.    Once this is done we need to complete the signing request against your internal certificate authority. I have used the web request of our SubOrdinate for this example. Use the same internal CA as what you used for SSL procurement for your Lync platform!


      Save the signing request.

        7.  We now need to complete the signing request using Import-ExchangeCertificate. Information on this cmdlet is available here: http://technet.microsoft.com/en-us/library/bb124424.aspx

       Import-ExchangeCertificate -FileData ([Byte[]]$(Get-Content -Path ‘x:\cert location’ -Encoding byte -ReadCount 0))


The certificate is now installed.
 
Ensure you do this for all Exchange 2013 Back End Servers.


8.        We are now in a place where all our Exchange 2013 Front End Servers have had the necessary configuration via Powershell and ‘Set-OWAVirtualDirectory’, and we have installed Certificates on all our Exchange 2013 Back End servers. We now need to edit a web config file on each Exchange 2013 Back End.

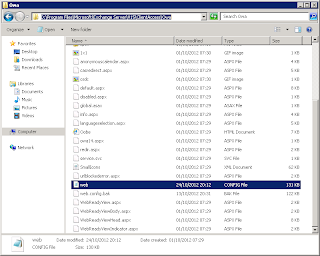
      The file we want to modify is the web.config file in the following location “x:\Program Files\Microsoft\Exchange Server\V15\ClientAccess\Owa”. Where x is the drive you installed too.


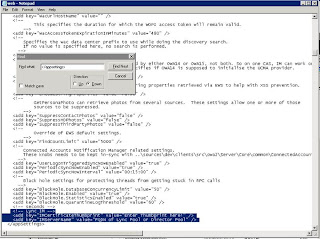
     9.    Open the Web Config file and perform a search for “</appsettings>”. This takes you to the end of all App Settings configuration. Add these two lines in:


    <add key="IMCertificateThumbprint" value="Enter Thumbprint here!" />
   <add key="IMServerName" value="FQDN of Lync Pool or Director Pool" />


 You can see I have commented this out to explain the change I am making.
 

 It is important to note that the thumbprint you enter in each web.config file is the thumbprint of the Certificate you have created on each Back End server.

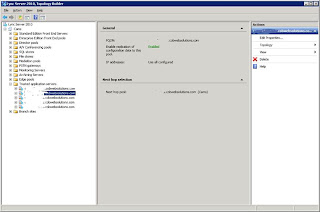
      10.   Once you have performed this on all Back Ends we need to open the Lync Topology Builder and enter each Back End as a Trusted Application

       Add each Exchange 2013 Back End server separately, matching the FQDN of the server and the certificate published for the Back End as the Trusted Application. Add all required Exchange 2013 Back Ends.


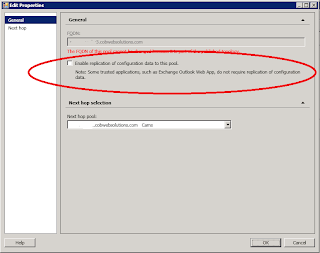
      11.   Once created you can edit them and remove ‘Enable replication of configuration data to this pool’ as this is not needed for Lync IM integration.


     12.  Once all have been added Publish the Topology.


    13.   We now need to open a Lync Powershell session and perform the following:

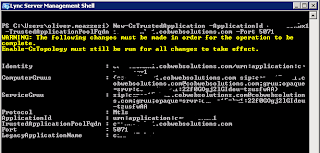
       New-CsTrustedApplication –ApplicationID “Server Name” –TrustedApplicationPoolFqdn “FQDN of Exchange 2013 Back End server” –Port ‘desired port number’

I     Set the ApplicationID as the server name for easy reference. Set the TrustedApplicationPoolFQDN as the FQDN of the Exchange 2013 Back End you are adding. Add a port number that isn’t in use. I normally start at 5070 and work my way up after ensuring they aren’t in use.


      14.  Once this is done ensure you repeat it for every Exchange 2013 Back End server that you need and indeed published in the Topology Builder in step 11. and 12.


       15.  Finally we may need to do the following two things to get Lync IM integration working.

      The first is to recycle the MSExchangeOWAAppPool on each Exchange 2013 Back End. This is needed to be done only if IM integration is not working in OWA.

       The second is to restart IIS on each Exchange 2013 Front End server. This is needed to be done only if IM integration is not working in OWA.

 
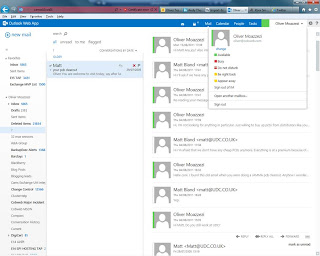
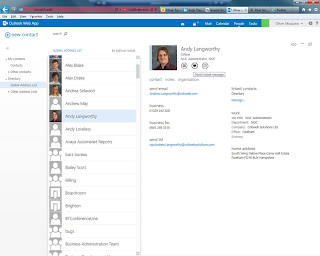
     16.    Open OWA. You should now be able to sign in and see this:


      The first thing you’ll notice over Exchange 2010 OWA integration is that the contact list is not shown on the left pane anymore. You have to get it from the People Hub.


     If you aren't seeing the above then you may have an OWA Mailbox Policy that isn't allowing IM. Perform in Powershell: Get-OWAMailboxPolicy to confirm against the affected users.

     In the event this is the issue, use:

     "Set-OWAMailboxPolicy -identity 'OWAMailboxPolicy' -InstantMessagingType OCS" to fix.

    That’s it! Take care.

   
     Oliver Moazzezi - MVP Exchange Server


Monday 22 October 2012

Microsoft Surface RT I pre-ordered :D

7 weeks ago I blogged about the upcoming Microsoft Surface after watching the live annoucement for the Pro and RT devices.

Well I pre-ordered as soon as the UK Microsoft online store was up :-) I should have it in the next 6 days.

I can't wait and will post up some of my initial impressions and experiences ASAP!

So which one did I get? I went for the 32GB with touchcover. Can't wait!


Take care,

Oliver Moazzezi - MVP Exchange Server


Exchange 2013 Preview: Data Loss Prevention

Exchange 2007 and 2010 offered the concept of Hub Transport Rules, allowing an Administrator to create mail flow rules based on a set of parameters and rulesets. On top of this there was also support for a Custom Transport Agent (eventsink) allowing true customization at the transport layer.
 
Both agents supported Regular Expressions. See “Regular Expressions in Hub Transport Rules” http://technet.microsoft.com/en-us/library/aa997187(EXCHG.80).aspx
 
In Exchange 2013 Preview this concept has evolved and we now have the concept of Data Loss Prevention, or DLP.
 
This is supported in Powershell as well as the Exchange Administrative Center, or EAC. I will show you the steps for creating a DLP Policy here using the EAC, however the Exchange cmdlets you are interested in should you so wish to user Powershell are based on DlpPolicy. For example, Get-DlpPolicy, New-DlpPolicy etc.
 
 
So in Exchange 2013 Preview log into the EAC. Go to the Compliance Management section and select ‘Data Loss Prevention’
 
 
Select to create a new DLP Policy from a template, I am specifying UK financial data here to pick up on a credit card number and setting it to report to an incident management mailbox


Once created we can test the policy, enforce it or test  with notifications
 
 
I set it to alert with a notification
 
 
Finally I publish the policy and then send an email with a (faked) credit card number.


My email is reported to the incident mailbox and a notification is sent.
 
 
You can see this is a far easier and manageable solution than using Regular Expressions such as
 
(\\()*\d\d\d(\\)|\s|.)\d\d\d(-|.)\d\d\d\d
 
 
Take care,

Oliver Moazzezi - MVP Exchange Server


Friday 20 July 2012

Installing Exchange 2013 Preview

Exchange 2013 Preview

Microsoft have released Exchange 2013 Preview and this first blog post based on a series for Exchange 2013 helps install it. I will over the next few weeks be releasing many blogs posts focusing on the features within the Preview and what it means for the future of Exchange as well as giving insight into how to configure Exchange 2013 with the existing features we all know and love.

I have created an Exchange 2013 Preview lab where I will be blogging about the new features and ways of management in this preview release.

For information my lab consists of a single HyperV virtual machine running both as a Domain Controller and a combined role Exchange 2013 Preview server.

Let’s get started.

First of all please see this Technet (http://technet.microsoft.com/en-us/library/bb691354(v=exchg.150)) article for configuring your Windows 2012 or Windows 2008 R2 server. For setup simplicities sake I have gone with Windows 2008 R2, and I have chosen Enterprise, so I can create a DAG.

The actual download location to Exchange 2013 Preview is here: http://technet.microsoft.com/en-us/evalcenter/hh973395.aspx


Windows 2008 R2 additional files needed and step are noted below:

  1. Open Windows PowerShell.
  2. Run the following command to load the Server Manager module.
Import-Module ServerManager
  1. Run the following command to install the required Windows components.
Add-WindowsFeature Desktop-Experience, NET-Framework, NET-HTTP-Activation, RPC-over-HTTP-proxy, RSAT-Clustering, RSAT-Web-Server, WAS-Process-Model, Web-Asp-Net, Web-Basic-Auth, Web-Client-Auth, Web-Digest-Auth, Web-Dir-Browsing, Web-Dyn-Compression, Web-Http-Errors, Web-Http-Logging, Web-Http-Redirect, Web-Http-Tracing, Web-ISAPI-Ext, Web-ISAPI-Filter, Web-Lgcy-Mgmt-Console, Web-Metabase, Web-Mgmt-Console, Web-Mgmt-Service, Web-Net-Ext, Web-Request-Monitor, Web-Server, Web-Stat-Compression, Web-Static-Content, Web-Windows-Auth, Web-WMI
After you've installed the operating system roles and features, install the following software in the order shown:
  1. Microsoft .NET Framework 4.5 RC
  2. Windows Management Framework 3.0
  3. Microsoft Unified Communications Managed API 4.0, Core Runtime 64-bit
  4. Microsoft Office 2010 Filter Pack 64 bit
  5. Microsoft Office 2010 Filter Pack SP1 64 bit
  6. Microsoft Knowledge Base article KB974405 (Windows Identity Foundation)
  7. Knowledge Base article KB2619234 (Enable the Association Cookie/GUID that is used by RPC over HTTP to also be used at the RPC layer in Windows 7 and in Windows Server 2008 R2)
  8. Knowledge Base article KB2533623 (Insecure library loading could allow remote code execution)
For Exchange 2013 Preview, you must also do the following in the order shown:
  1. Uninstall Microsoft Visual C++ 11 Beta Redistributable (x64) This task must be done after you've installed UCMA, but before you run Exchange 2013 Preview Setup. To uninstall Microsoft Visual C++ 11 Beta Redistributable (x64), do the following:
    1. Open Control Panel > Programs and Features.
    2. Select Visual C++ 11 Beta Redistributable (x64) - 11.0.50531 and then click Uninstall.
    3. In Microsoft Visual C++ 11 Beta setup, click Uninstall.
    4. When Microsoft Visual C++ 11 Beta is uninstalled, click Close.
  1. Register ASP.NET with .NET Framework 4.5 in Internet Information Services (IIS) This must be done after you've completed the process described earlier in “Uninstall Microsoft Visual C++ 11 Beta Redistributable (x64)”, but before you run Exchange 2013 Preview Setup. To register ASP.NET with .NET Framework 4.5 in IIS, do the following:
    1. Open a Windows Command Prompt.
    2. Run the following command:
%SystemDrive%\Windows\Microsoft.NET\Framework64\v4.0.30319\aspnet_regiis.exe -ir -enable
    1. Run the following command to restart the IIS services:
IISReset
 
However I decided to restart the server
 
 
Once the server is backup unpack the Exchange 2013 Preview exe. You should have the following now in front of you:


Run the Setup.exe, providing you have correctly installed the pre-reqs setup will run


I chose to check for updates and indeed it did find them


Exchange 2013 Preview will then copy files locally just like previous versions of Exchange (check temp folders to see) and then we are ready to begin.


Note you can choose at this point to check out ExDeploy which supports Exchange 2013.


Accept the agreement


I selected to turn on error reporting. I never do this in a production environment unless deemed necessary but as this is a preview I am sure Microsoft welcome any reports sent home


I selected here to choose an all in one server, this includes both the Mailbox and Client Access roles. If you are separating roles note the pre-reqs
for role install in the above Technet article I linked to.


This is so far all pretty standard stuff! Select your install location


Select your Org name


Exchange 2013 Preview offers a default level of anti-malware scanning. This is a welcome addition to the latest version of Exchange server. I selected to enable it.


Configure your internet facing CAS FQDN – of course this can be changed after the install


I selected to join the Customer Experience Improvement Program


Exchange 2013 will then perform readiness checks


Setup as per previous versions of Exchange take a little while until it completes


And that’s it! The install has completed. So lets look in the Start Menu under Programs…


Wow – we can see the Exchange Management Shell and the Exchange Toolbox as well as help – but wheres the Exchange Management Console? Well the answer is it has been replaced with
The Exchange Admin Center – or the EAC for short. This is an evolution of the Exchange Control Panel (ECP) from Exchange 2010


Let’s login. We can see the entire management UI interface is now within the EAC – the Exchange Management Console now no longer exists. It is now an entirely HTML based UI experience or of course Powershell is still supported.


Please look out my next Blog posts which will be released in the next 7 days. I will cover:

Getting to know the Exchange Admin Center
Performing common tasks using the EAC
New features of Exchange 2013 Preview: Data Loss Prevention
DAG creation via the EAC and within Powershell.
Exchange 2013 Preview, under the hood for multi-tenant hosting
Exchange 2013 anti-malware scanning

And more.

Take care,

Oliver Moazzezi - MVP Exchange Server