Showing posts with label OWA. Show all posts

Tuesday, 20 January 2015

Installing an Office OWA app manifest file in Exchange 2013 (Part 2)

In Part 1 I went through installing an OWA manifest file either through the ECP, or via the Exchange Management Shell that wasn't part of the Office Store. In this part I wanted to cover how to push an App out to selected users as well as scripting deployment .

Restricting Apps to a Distribution Group via 'SpecificUsers'


1. Get the Distribution Group, and then in the Exchange Management Shell run the following

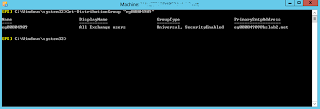
Get-DistributionGroup "Group Here"


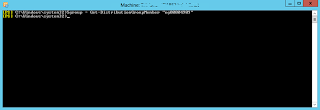
2. Once you have confirmed the DL, run the following

$group= Get-DistributionGroupMember "All Users Security Group Name"

Note we have changed the command to "Get-DistributionGroupMember"


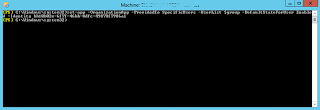
3. To install the App to the the users in the DL run the following command

New-App –OrganizationApp –ProvidedTo SpecificUsers –userlist $group –DefaultStateForUser enabled –url "your manfiest XML file url here"

As mentioned in Part 1, if you want to force the app to be always enabled and disallow the users from disabling it you can set –DefaultStateForUser to –DefaultStateForUser AlwaysEnabled. Similarly if you want the app to be available but only enabled by the user you can set it to Disabled

Alternatively if you have the app already installed you can run:

Set-App –OrganizationApp –ProvidedTo SpecificUsers –UserList $group –DefaultStateForUser Enabled –Identity "App ID (GUID)"

This will change the state of the App to specific users and set it to enabled, again, modify –DefaultStateForUser as you so wish


4. Once the App has been set to Specific Users you can check it using the EAC:


5. You will find the Distribution Group members now have the app, and all other users do not. There are other ways of selecting users however, we could have for example performed

"Get-Mailbox –OrganizationalUnit "DistinguishedName of OU" instead of "Get-DistributionGroupMember"

Therefore we could use "$users = Get-Mailbox –OrganizationalUnit "DistinguishedName of OU"


Scripting via Powershell

So pushing an App out to specific users is great, but the delivery method doesn't take into effect new users joining the Distribution Group or Organizational Unit as well as users that are removed. For that we need to use a script. The below scripts can be used as a scheduled task, and will push the App out to the specific users required. One is for DL delivery and the other via OU. The only two I have so far needed.


#Install Office App to single Organizational unit

#SPECIFY OU DISTINGUISHEDNAME HERE
$users = Get-Mailbox -OrganizationalUnit "DistinguishedName of OU here"
$tenant = Get-OrganizationalUnit "DistinguishedName of OU here"
$tenantidentity = $tenant.name
$xmlmanifest = "URL to manfifest file"

#Start
Write-Host The total number of mailbox enabled users found for $tenantidentity is ($users).count -foreground yellow
New-App –OrganizationApp –ProvidedTo SpecificUsers –userlist $users –defaultstateforuser enabled –url $xmlmanifest
Write-Host Office App installation complete for $tenantidentity -foreground yellow


#Install Office App to for Distribution Group

#SPECIFY DISTRIBUTION GROUP HERE
$Group = Get-DistributionGroupMember "Security Group Name here"
$tenant = Get-DistributionGroup "Security Group Name here"
$tenantidentity = $tenant.name
$xmlmanifest = "URL to manfifest file"

#Start
Write-Host The total number of mailbox enabled users found for $tenantidentity is ($Group).count -foreground yellow
New-App –OrganizationApp –ProvidedTo SpecificUsers –userlist $Group –defaultstateforuser enabled –url $xmlmanifest
Write-Host Office App installation complete for $tenantidentity -foreground yellow


That's it for now, take care.

Oliver Moazzezi - MVP Exchange Server


Tuesday, 14 October 2014

Google Chrome Browser and Outlook Web App and Exchange Admin Center issues

Microsoft have released a kb alluding to all the 'showModalDialog' issues customers have been having when using certain Office365 web portal or Outlook Web App and Exchange Admin Center settings when using Google Chrome as their web browser.


The current fix is classed as a workaround, meaning most likely a permanent fix will be put in place at a later date. As this is a deprecated feature it is likely an update to Exchange will fix this issue. We will have to wait and see!

The work around is detailed below:


1. Click Start, type regedit in the Start search box, and then click regedit.exe.
2. Locate and then click the following registry subkey:
HKEY_LOCAL_MACHINE\SOFTWARE\Policies\Google\Chrome\EnableDeprecatedWebPlatformFeatures

3. On the Edit menu, point to New, and then click String Value.
4. Type 1, and then press Enter.
5. Right-click the 1 string value that you created, and then click Modify.
6. In the Value data box, type ShowModalDialog_EffectiveUntil20150430, and then click OK.


If the key is missing entirely under ..\\SOFTWARE\Policies we need to create it.

Seeing as my workstation was missing this I thought I'd take a few screen shots of the process for those small shops that are using Office365 are don't necessarily have any IT experience.


Right click Policies and select New > Key and enter Google


Create sub keys for Chrome and EnableDeprecatedWebPlatformFeatures as shown


Finally enter the key as mentioned.


Take care

Oliver Moazzezi - MVP Exchange Server


Tuesday, 25 March 2014

Customising Exchange 2013 Outlook Web App


The question for the last year has been whether it is supported to customise Exchange 2013 OWA and where the Technet documentation was, if like in previous versions of Exchange it was supported.

Technet Forum threads going back as far as April 2013 and indeed many blog posts exist about toying with the customisation of the OWA logon page, for example, here and here. But apparently no official guidance existed.

So as per the Technet Forums thread that I posted a response to here, I said I would find out where that guidance was from the Exchange PG.

Well that answer came into my inbox yesterday courtesy of Microsoft:


The official Technet Exchange 2013 OWA customisation articles are here:

Customize the Outlook Web App Sign-In, Language Selection, and Error Pages

Create a Theme for Outlook Web App


Now the confusion exists as these are for Exchange 2013, but they inform the reader that they are really for Exchange 2010 SP2.

I have been informed that this will be cleared up and they will correctly say they apply to Exchange 2013 imminently.


So if you want to customise Exchange 2013 OWA within the realms of supportability until your hearts content, then use the two Technet articles above. And if in the meantime you are referencing them and they say they apply to Exchange 2010 SP2, don't be put off, use them confidently.

Enjoy!

Take care,
Oliver Moazzezi - MVP Exchange Server


Wednesday, 17 April 2013

Customizing Role Assignment Policies for multi-tenants in Exchange Server 2013: Gal Pictures

When dealing with multi-tenants in Exchange Server 2013 (RTM and CU1) with a Hosting Control Panel that can only feed data into Exchange, rather than taking data back out of it to back-fill the Portal we have to lock down certain elements to only allow a customer to edit certain aspects via their desginated Panel Provider.
 
Take Exchange 2013, by default in most multi-tenant Hosting Orgs “MyContactInformation”, “MyPersonalInformation”, “MyMobileInformation” and “MyAddressInformation” and disabled, only allowing a tenant to configure this from the Hosting Control Panel.
 
The biggest issue this presents is that this means a user cannot change their Photo within OWA, as this is locked into “MyContactInformation”
 
 
1. A user cannot change their picture and thus it is empty, giving an unfulling experience in Outlook, OWA and Lync.


2. The logged in user can’t change their picture
 
 
3. Additionally other information is locked down also


So if we log into the EAC we can see this is because the Default Role Assignment Policy has “MyContactInformation”, “MyPersonalInformation”, “MyMobileInformation” and “MyAddressInformation” disabled. Standard practice in nearly all Enterprise Hosting environments.


So how can we keep this aspect locked down, allowing co-existence with a Control Panel but allowing tenants to actually upload pictures to get a more fulfilling experience?
 
Let takes a look at the Management Roles in question in PowerShell. We can do this simply by using “Get-ManagementRole”
 
 
So we can see above that “MyContactInformation” owns “Set-UserPhoto”, “Remove-UserPhoto” and “Get-UserPhoto”. We can take this built in Management Role and create a custom one from it, to allow pictures to be uploaded and used.
 
 
Let’s create a new Management Role using “New-ManagementRole”. We’ll call it “Oliver Test” and create it from the parent “MyContactInformation”


Now if I view this new Management Role I can see it has all the cmdlets from the parent.


I can now start to customise it by removing certain cmdlet elements. You can see I am using “Get-MangementRoleEntry”, specifing the cmdlet I do not want, and then removing it with “Remove-ManagementRoleEntry”
 
 
Once I have cleaned up my Management Role “Oliver Test”, let’s look at what I have left. You can see I now have just the cmdlets needed to allow photos to be uploaded and removed and edited if desired.
 
 
Logging back into the EAC I can now see this new Management Role under the Default Role Assignment Policy. I check it to enable it.
 
 
Logging back into my tenant user I am now able to change my photo, allowing picture integration into Outlook, OWA and Lync.


Checking the rest of my details you can see as before I cannot edit them, keeping the unity of your Hosting Control Panel which should control these settings.


Finally let’s log into OWA and Lync and see the new experience!


I hope this helps Hosters to integrate pictures into Exchange 2013 Enterprise. I will look to push a new blog out in a few weeks for managing different Role Assignments Policies per tenant in Exchange 2013 Enterprise.
 
Have a great week!
 

Take care!
 
Oliver Moazzezi - MVP Exchange Server


Monday, 21 January 2008

Web Ready document viewing (and some other SP1 improvements)

One of the best improvements for Exchange 2007 is the change to the user experience when using Outlook Web Access. You need SP1 to benefit from all the changes, my favourites include Web Ready Document Viewing for the Office 2007 file formats, but you also get the ability to configure server side rules, access to the Deleted Items recovery, S/MIME support, and, in SP1 the return of Public Folder access.

Web Ready document viewing is simple - "Open as Web Page" renders documents in your browser as HTML without the need to download the document, or have Microsoft Office installed. There is support for Word Excel and PowerPoint in both 2003 & 2007 formats.
Sometimes OWA is a whole lot easier to use than Outlook. With Microsoft adding many new features with every release, maybe the days of Outlook on the desktop are numbered?