Thursday 21 May 2015

Automating the creation of mail enabled Security Groups for a Cutover Migration


One of the benefits of performing a native Cutover migration is that distribution groups are created and memberships nested during the migration batch. Unfortunately Security Groups are not created automatically during a Cutover migration, however if they exist during the Cutover migration they will be populated and assigned their correct address, so we must pre-stage them prior to the mailbox moves.

To pre-stage them we need to have a matching Name, DisplayName and Alias. We should also assign an email address as they will be mail enabled. During the Cutover migration the correct addresses will be assigned, so we can simply provide an @tenant.onmicrosoft.com address during the pre-stage process.

So can we automate this? Creating them manually isn't much of an issue for relatively few, but when there are a lot some automation is appreciated and makes your job far easier.


So let's take a look.

First of all let's take a look at the Security Groups.

Get-DistributionGroup |where{$_.recipienttype –like "*security*"}

Once happy, we can export them to CSV, taking the attributes we need for an import into Office 365.

Get-DistributionGroup |where{$_.recipienttype –like "*security*"} |Select Name,DisplayName,Alias,WindowsEmailAddress


We don't actually need the Windows email address, but we can use the outputted CSV to check the default address after we have automated their import into Office365 and the Cutover migration has assigned the correct addresses.


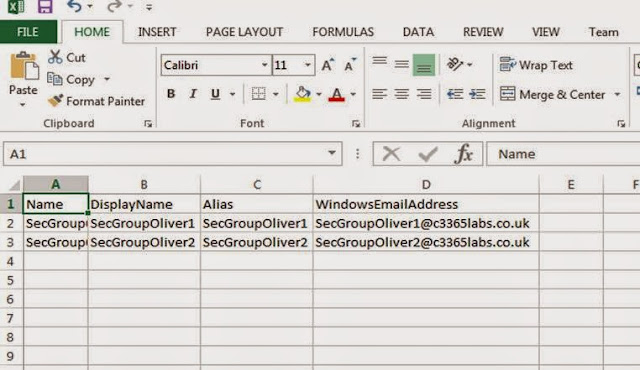
So let's take a look at the CSV data – check it and ensure it is correct and the Name, DisplayName and Alias fields are populated:


When we are ready to import the Security Groups into Exchange Online, open a remote Powershell session to your tenant.

Once in, we need to import the CSV file and map the New-DistributionGroup creation to map the Name,DisplayName and Alias fields and also assign an @tenant.onmicrosoft.com address.

So how do we do this?

Import-Csv "csv location" |ForEach { $alias = $_.Alias; $primary = "$alias@c3365labs.onmicrosoft.com"; New-DistributionGroup -Name $_.Name -DisplayName $_.DisplayName -Alias $_.Alias -Type Security -primarysmtpaddress $primary}

We take the CSV and import it.
We create a For Each statement to loop through the CSV
We add some Variables to assign the alias name (it will have no spaces so is ideal) to the tenant email address.
We then utilize the New-DistributionGroup cmdlet and use variables to populate the Name, DisplayName and Alias' from the CSV and assign the aforementioned @tenant.onmicrosoft.com address.

Depending on how many mail enabled Security Groups you are importing this may take some time. But once completed you will see they have been created:


That's all for now.

Take care,

Oliver Moazzezi – MVP Exchange Server
Twitter: @OliverMoazzezi

Friday 15 May 2015

Auditing and converting Shared Mailboxes after a Cutover, Staged or Third Party migration


Moving mailboxes to Office 365 is a painless experience, providing of course it has been planned carefully. Unless you move mailboxes using Exchange Hybrid you will need to convert your shared mailboxes back to a shared mailbox once they have been moved however. This is the case for Cutover, Staged or using some third party tools like MigrationWiz.
So let's look how we would normally convert one mailbox manually.
1. Once the mailboxes have moved, logon to the tenant and in the Exchange Admin Center, select the mailbox. On the right hand side you will have 'convert to shared mailbox'


2. Selecting this brings up the following warning, select Yes

3. And that's it - the mailbox is now a shared mailbox:


So that's great if you only have one, or a select few shared mailboxes that makes the task of doing this for each one manually a very short, if somewhat mundane affair.
So what happens if you have a lot?
Well you can do it manually like in the scenario above, or we can automate it.
In this case we can audit them in preparation for any move to Office 365.
1. Get a list of all shared mailboxes from on premise Exchange Management Shell session

Get-Mailbox –resultsize unlimited –recipienttypedetails sharedmailbox |Select userprinciplename |Export-CSV


2. This will provide an output like the following. Check the CSV is formatted correctly and clean it up if necessary


Finally, after you have moved the mailboxes, with your Exchange Online PS Session, run the following command:

Import-Csv "csv file" |ForEach { Set-Mailbox –Identity $_.UserPrincipalName –Type shared }


Running Get-Mailbox –Type Shared should then show all required mailboxes have been converted to shared mailboxes.
We can continue to run this command with the full CSV even if not all the shared mailboxes have been moved over, you will simply get an error for the ones that haven't been moved yet, and a yellow informational alert for the ones that already have and thus are already of the type: shared.
In this scenario the mailboxes should not have been licensed, so there's no need to remove any licensing from them as you will still be in the grace period – as Shared Mailboxes do not require a license in Office 365. If for some reason you are facing a scenario where they are, I will post up next week how to clean this up with a remote powershell session to Azure AD for a more automated removal of any assigned license.
Take care,
Oliver Moazzezi – MVP Exchange Server
Twitter: @OliverMoazzezi

Tuesday 5 May 2015

Microsoft Ignite - announcing "Office 365 for Exchange Professionals"

I have had the great pleasure these past few months of reviewing a new eBook that is launching this week, called "Office 365 for Exchange Professionals".

The book has been written by Tony Redmond, Paul Cunningham and Micheal Van Horenbeeck which provides fantastic deep technical knowledge and real world scenarios for Exchange Admins looking to move, or indeed, already managing Exchange Online in Office 365.

The book covers a myriad of scenarios including:

When and how to use Cutover, Staged and Hybrid migrations – and talks about potential pitfalls and benefits of third party migration tools

How the Office 365 architecture and infrastructure has evolved from Live@Edu and BPOS into the Azure aligned cloud platform it is today

How to synchronise your on premise users to the Cloud using Directory Synchronisation and achieve single sign on with Active Directory Federation Services

Managing objects in the Cloud like mailboxes, distribution groups and activating Exchange Online features for your business and users

How to utilise eDiscovery, retention and Information Rights management policies and manage auditing in your Office 365 deployment

And many more.

The eBook provides real world insight to your Office 365 deployment or migration and will impress upon you the best approach and practices for any Office 365 transition – something many current books simply lack with their black and white approaches to 365 management; designed to give you just enough knowledge to pass an MCP exam.


The book is being launched at Microsoft Ignite, please grab your copy there or add this link to your favourites to await more information on its release:


Take care,

Oliver Moazzezi - MVP Exchange Server

Cloud Solution Provider Program Multi Channel capability is coming!

Microsoft will be releasing multi channel capability on (or close to) Wednesday May 6th!

Here's a snippet from non NDA release notes from Microsoft released on Friday to all CSP partners and Microsoft Partners.


"I’m excited to share that Multi-Channel capability is coming to the Cloud Solution Provider (CSP) program, on track for release on or close to Wednesday, May 6th.   Multi-Channel provides CSP partners like you the ability to provision CSP subscriptions for customers that already have an existing tenant with existing subscriptions purchased through other Microsoft Channels (e.g., Direct, Open, Advisor, etc). In short, CSP subscriptions can co-exist with other subscriptions on the same tenant.

Multi-Channel capability has been one of the most requested features that our CSP partner community has asked for to help enable new Office 365 sales opportunities through CSP. Prior to enabling Multi-Channel, it was only possible for you, as a CSP partner, to order subscriptions for customers that you provisioned as a CSP Partner on a separate tenant. However, it’s common to work with customers who have an existing tenant and in these cases you need the ability to provision CSP subscriptions for these customers on their existing tenant. Multi-channel capability makes this possible.

A comprehensive overview of Multi-Channel capabilities is provided in the attached walk-through deck and FAQ document.  I encourage you to review both files and contact me if you have any questions. Briefly, Multi-Channel:

·         Enables CSP partners to provision CSP subscriptions for a customer that has an existing tenant
·         Enables CSP subscriptions to co-exist with other subscriptions on the same tenant (e.g. purchased directly from Microsoft, via Open, EA)
·         Allows your customer to retain full control over their existing subscriptions

It’s important to note that Multi-Channel does NOT provide the capability to transition existing subscriptions over to CSP subscriptions. All of the customer’s previously provisioned subscriptions remain, the customer maintains control over those subscriptions and the terms of those existing subscriptions are not changed in any way. Additionally, Multi-Channel does NOT enable multiple CSP partners to sell to the same customer. There can only be one CSP Partner associated with a single customer. “Multiple-CSP Partners”  is a separate capability which is included in the CSP roadmap for release in CY15/Q3".


Being able to now split purchasing between different vendors provides an exciting opportunity to Office 365 customers as long as Microsoft removes any confusion of having different pieces of 365 from different suppliers.


Have a great week!

Take care,

Oliver Moazzezi - MVP Exchange Server