Wednesday 15 January 2014

Exchange 2013 DAG Seeding Error: An address incompatible with the requested protocol was used

Recently this issue came up in our test lab whilst updating to and testing Exchange 2013 CU3.

"The mailbox database copy 'DATABASE\SERVER has failed to update from server . Do you want to clean up that
update request now? Seeding cannot be requested for the same database copy until the failed request has been cleaned up
by the server, which should automatically happen within 15 minutes.
[Y] Yes  [A] Yes to All  [N] No  [L] No to All  [?] Help (default is "Y"):"

Prompting Yes then presented this error:

"The seeding operation failed. Error: An error occurred while performing the seed operation. Error: An error occurred
while communicating with server 'SERVER'. Error: An address incompatible with the requested protocol was used
[Database: DATABASE, Server: SERVER.FQDN.COM]
    + CategoryInfo          : InvalidOperation: (:) [Update-MailboxDatabaseCopy], SeedInProgressException
    + FullyQualifiedErrorId : [Server=SERVER,RequestId=6e64fbd7-a753-453d-805c-704363ec7495,TimeStamp=03/01/201
   4 11:34:54] A35E0624,Microsoft.Exchange.Management.SystemConfigurationTasks.UpdateDatabaseCopy
    + PSComputerName        : server.fqdn.com"


Additionally this was logged in Event Viewer:


Subsequent retries failed to successfully seed the database.

However, once the Replication Service was restarted on the DAG member this issue was resolved and seeding was succesful.

Test-ReplicationHealth was not run to see if this would have given in any insight to the offending DAG member. It would be interesting to see if this would have provided anymore useful information. You can find the Technet article on the Exchange cmdlet here.

Take care,
Oliver Moazzezi - MVP Exchange Server


Monday 13 January 2014

Distribution Groups and Lync 2013 LHPv2 - Part 3

Please see here for Part 1, and here for Part 2

The final part of Distribution Groups and Lync 2013 LHPv2!

This part automates the SQL clean up with the use of the SQL Stored Procedure 'rtcDeleteABEntry'.

In Part 1 we used the SQL T statement to delete the offending ObjectGUID from the rtcab database as can be seen here:


This is great for a single or a very small number of deletions but not so great if you have many ObjectGUIDs that need to be deleted for a Tenant.


The following script will automate this for you. Please be aware you need to export the ObjectGUIDs to a CSV, which was covered in Part 2.


#Distribution Groups and Lync 2013 LHPv2 – Bulk SQL deletion
# www.exchange2010.com  Oliver Moazzezi 2014
# SQL automation help gratefully received from James Sperring http://blog.sperring.me – thanks!

$SqlConnection = New-Object System.Data.SqlClient.SqlConnection
$SqlConnection.ConnectionString = "Server=.;Database=rtcab;Integrated Security=True"

$guids = Import-Csv C:\test.csv
$spName = "RtcDeleteAbEntry"
$paramName = "@_AdObjectGuid"

foreach ($g in $guids.Guid) {
  Write-Host "Executing $spName for $g"

  $guid = [guid]$g

  $SqlCmd = New-Object System.Data.SqlClient.SqlCommand
  $SqlCmd.CommandType = [System.Data.CommandType]::StoredProcedure
  $SqlCmd.CommandText = $spName
  $SqlCmd.Connection = $SqlConnection
  $parameter = $SqlCmd.Parameters.Add("@_AdObjectGuid", [System.Data.SqlDbType]::UniqueIdentifier)
  $parameter.Value = $guid

  $SqlAdapter = New-Object System.Data.SqlClient.SqlDataAdapter
  $SqlAdapter.SelectCommand = $SqlCmd
  $DataSet = New-Object System.Data.DataSet
  $SqlAdapter.Fill($DataSet)
  $SqlConnection.Close()
}

Write-Host "All Tenants GUIDs have been removed from the rtcab database. Remember to run Update-CsAddressBook" -foregroundcolor red -backgroundcolor yellow


Ensure to save locally as a PS1 script.

Ensure you update "$guids = Import-Csv C:\test.csv" to be the location of your CSV file, otherwise simply rename it to test.csv at the root of C:\.

Also note that the line "$SqlConnection.ConnectionString = "Server=.;Database=rtcab;Integrated Security=True" points to the local SQL server, as I have used "." – change this to the Server name that is hosting the SQL rtcab database if you aren't running this locally!

Once it has ran in Powershell you will see the following output:


Note that each 0 is the output from the SQL stored procedure saying that command completed successfully.

And finally after this has completed ensure that you run Update-CsAddressBook !

Enjoy!

Oliver Moazzezi - MVP Exchange Server


Friday 10 January 2014

Distribution Groups and Lync 2013 LHPv2 - Part 2


Yesterday I posted Part 1 of this blog here, so thought it prudent to get Part 2 out of the door as soon as possible.


Part 1 showed how to make existing mail enabled Distribution Groups show within the Lync client for Lync 2013 LHPv2 tenants. This part will show how to bulk prep all Distribution Groups for a tenant in Active Directory, ready for removal from SQL via the rtcDeleteAbEntry Stored Procedure

1. Import-Module ActiveDirectory


This will loads up the Active Directory shell

2. We now need to take the ObjectGUID of the tenants OU and append this to the msRTCsip-groupingID and msRTCSip-tenantID of each Distribution Group. Yesterday this was a manual process against a single Distribution Group to show you how it worked. Today we'll script it within Powershell so you can update all Distributions groups for a tenant.

Take the distinguishedName of the tenants OU (I am using the same tenant as I did for Part 1). Run in the Exchange Management Shell:

$OU = " OU=TestLyncPlan2013,OU=Provider,OU=Hosting,DC=hslab2,DC=net "

$OUObject = Get-ADOrganizationalUnit -Identity $OU

$GUID = $OUObject.ObjectGUID


What this is essentially doing is binding the Organizational Units distinguishedName to $GUID


3. If you want we can then do a quick count of the Distribution Groups in the tenants OU.

(Get-AdGroup -SearchBase $OU -filter *).count


4. We will now bulk set the missing msRTCSIP-GroupingID onto all the Distributions Groups above.

Get-AdGroup -SearchBase  $OU -filter * -Properties msRTCsip-groupingID |set-adgroup -Replace @{'msrtcsip-groupingid'=$GUID}


This is taking the Distribution Groups via the Get-AdGroup cmdlet and getting the property msRTCsip-groupingID. From there we are telling it to replace the value it finds with $GUID using Set-AdGroup

5. Let's now do the same again for the msRTCsip-TenantID:

Get-AdGroup -SearchBase  $OU -filter * -Properties msRTCsip-TenantID |set-adgroup -Replace @{'msrtcsip-tenantid'=$GUID}


6. That's it all done!


We can turn this into a Powershell script. This would look like the following (copy it and add it to a PS1 file locally):

# Lync 2013 LHPv2 Distribution Group bulk set for msRTCsip-GroupingID and msRTCsip-TenantID
# www.exchange2010.com Oliver Moazzezi 2014

$OU = "Enter tenants DistinguishedName for OU here"

$OUObject = Get-ADOrganizationalUnit -Identity $OU

$GUID = $OUObject.ObjectGUID

Write-Host The total number of Distributions Groups for the Tenant are:
(Get-AdGroup -SearchBase $OU –filter * -Properties msRTCsip-groupingID).count

#We will now set the msRTCSIP-GroupingID

Get-AdGroup -SearchBase $OU -filter * -Properties msRTCsip-groupingID |set-adgroup -Replace @{'msrtcsip-groupingid'=$GUID}

#We will now set the msRTCSIP-TenantID:

Get-AdGroup -SearchBase $OU -filter * -Properties msRTCsip-TenantID |set-adgroup -Replace @{'msrtcsip-Tenantid'=$GUID}

Write-Host Distributions Group attributes completed successfully -foreground yellow


So now all the tenants Distribution Groups have the correct multi tenant attributes set. You can now export all their ObjectGUIDs as covered in Part 1, and begin the task of deleting them via the rtcDeleteAbEntry SQL Stored Procedure.

Part 3 will cover bulk automating this!


Take care

Oliver Moazzezi - MVP Exchange Server


Thursday 9 January 2014

Distribution Groups and Lync 2013 LHPv2 - Part 1


The Lync 2013 LHPv2 official documentation goes into some detail about setting users for Tenant creation – however it does not state what to do for Distribution Groups – further it doesn't state how to make Mail enabled Distribution Groups work within the Lync client if a tenant already has Exchange, and enables Lync as a add-on later. Which is especially relevant seeing Lync 2013 LHPv2 has come to market later than Exchange 2013.

Because no documentation or blog exists flat out ANYWHERE on the Internet for this, I thought it a worthy addition to my 2014 blogs!

I also want to state this is Part 1 of a 3 part overview of Distribution Groups in LHPv2.

This part, Part 1, will cover the entire end to end process for making Distribution Groups show up, expand and work in the Lync client for an LHPv2 tenant.

Part 2 – this will cover automating the steps required in Active Directory on a per tenant basis

Part 3 – this will cover automating the steps required in SQL Server on a per tenant basis.

As you can see by Part 3 both the technical detail and automated procedures should be in place to help with this process once and for all. Which is great if you have a tenant with 300 Distributions Groups!

Firstly, for anyone looking for the official Lync 2013 LHPv2 documentation it is here: http://www.microsoft.com/en-us/download/details.aspx?id=39101

I recommend reading it. Please also be aware it is sensible to have a sound understanding of Lync, Active Directory and SQL to really get the best of this break down. A sound understanding of LHPv2 (Again! Read the official documentation in the download link above!) is also a wise investment – take some time to read the documentation if you haven't already, prior to proceeding.

Finally:

THESE STEPS ASSUME THE TENANT ALREADY HAS EXCHANGE AND HAS ENABLED LYNC AFTER. 

Please see the end of this post if this is vanilla Distribution Group creation.


1. Ensure you have added the msRTCsipTenantID and msRTCsipGroupingID attributes to the required distribution group. Copy them from a user within the tenant that is already created, or via the ObjectGUID of the tenants OU itself.


2. It is a good idea to wait for AD replication to occur – especially if you are multi site and do not have change based notification enabled. Go grab a cup of coffee.


3. Grab the distinguishedName from the Tenants OU in Active Directory:


4. From the Exchange Management Shell run the following including the Tenants OU distinguishedName from the previous step:

Get-DistributionGroup -OrganizationalUnit "distinguishedName here"


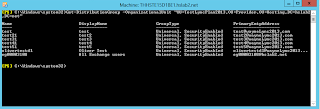
5. As we can successfully retrieve the Tenants distribution groups back, we will now export this data:

Get-DistributionGroup -OrganizationalUnit "distinguishedName here" |select guid |export-csv c:\GUIDExport.csv

This will export all valid ObjectGUIDs of each Distribution Group to CSV:


6. We now need to open SQL Management Studio on the SQL server that is hosting the rtcab database for address book query data. If you have a SQL mirror you can use the following command to work out which is the Principle and which is the Mirror:

Get-CsDatabaseMirrorState -PoolFqdn "Your Front End Pool FQDN holding the CMS"

7. Once in SQL Management Studio, search under 'rtcab' for the 'RtcDeleteAbEntry' Stored Procedure


8. Take the first GUID from your exported CSV and create a new Query. Run the following:

exec [dbo].[RtcDeleteAbEntry] 'Enter GUID here'


9. Finally Execute your SP. You will see the command completes successfully:


10. Repeat this for the remaining GUIDs you have.

11. Finally, open the Lync Management Shell and run:

Update-CsAddressBook

This will then start the process of trawling Active Directory and picking up these deleted Distribution Groups, and adding them back in with the correct multi tenant attributes.


12. Once the above process has completed you should see the Distribution Group now working for your Tenant. This can take anything from 15 minutes to an hour or so depending on the size of your deployment.  Enjoy!


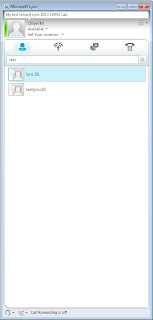
So that is the entire end to end process to fix broken Distribution Groups in Lync 2013 LHPv2.

I did say I would cover vanilla DL creation as a lot less work is required. These are the steps.


1. Create your Distributions Groups – ensure they are NOT mail enabled at this point in time. This is very important, otherwise the Lync address book service will pick them up and add them to the rtcab database.

2. Ensure you have added the msRTCsipTenantID and msRTCsipGroupingID attributes to the required distribution group. Copy them from a user within the tenant that is already created, or via the ObjectGUID of the tenants OU itself.

3. You are now free to mail enable them for Exchange use, wait for AD replication to occur from the previous step before doing this.

4. Once the address book service has run, it will automatically add them to the tenant without anymore work. If you want to speed this process up, change the times your address book service runs (default is once every 24 hours), or invoke Update-CsAddressBook at your leisure. If you want to check the schedule, invoke Get-CsAddressbookConfiguration.


So that's it, how to get Distribution Groups working in Lync 2013 LHPv2 in it's entirety. If at this point you are still having issues, there's two things to check:

The first: Ensure you are testing as an external user! Hit the external web services and not internal. I had issues with Internal Web Services, which is no surprise as LHPv2 has no concept of internal users.

The Second: Ensure Group Expansion is enabled. You can check this using Get-CsWebServiceConfiguration:


If it isn't you can set it to True using the following command: Set-CsWebServiceConfiguration –EnableGroupExpansion $true


Parts 2 and 3 will follow later this week.

Take care,

Oliver Moazzezi - MVP Exchange Server