
IM integration was a great feature in Exchange 2010 and is followed through into Exchange 2013.
The steps have changed slightly however and the current TechNet documentation isn’t _that_ clear. So I thought I’d write it up. You'll find the TechNet article here, and I hope you agree my blog is more informative.
Exchange 2013 has two roles. The Front End proxy, and the Back End. The Back End co-locates all roles which are: Mailbox, Client Access, Hub Transport and Unified Messaging.
In Exchange 2010 you configured the IM integration entirely on the server that had the Client Access role. This could be a standalone server all co-located role server depending on the infrastructure needed. This was a config file at Exchange 2010 RTM and later moved to Powershell and settings on OWA virtual directories with SP1+.
In Exchange 2013 configuration is necessary on both the Front End and Back End roles. Again this can be co-located or standalone. I will treat them as separated for ease of understanding here.
Exchange 2013 Front Ends

We can set these values with the following command:
3. “Set-OwaVirtualDirectory –identity “Exchange2013FrontEnd\owa (default web site)” –InstantMessagingEnabled $true –InstantMessagingType OCS”
(Ignore the yellow text in my example below – I’m running the command to show you but as I’ve already set these attributes it’s telling me no settings have been modified)


4. Perform the above command against ALL your Exchange 2013 Front End servers in your associated sites that need IM integration.
Exchange 2013 Back ends
Exchange 2013 Back ends
5. Once this has been set we need to configure certificates. But the certificate configuration is on our Back End Exchange 2013 Servers. Browse to your Back End Servers and generate a new Certificate using New-ExchangeCertificate against the internal CA that Lync uses. I recommend this TechNet article for Cert creation: http://technet.microsoft.com/en-us/library/aa998327.aspx
Use the following two commands:
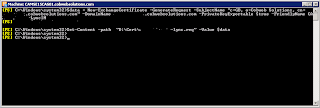
$Data = New-ExchangeCertificate –GenerateRequest –SubjectName “details here, use server FQDN as CN” –DomainName “FQDN of server” –PrivateKeyExportable $true –FriendlyName “Desired Cert Name”
Then:
Set-Content –Path “x:\your desired location” –Value $Data
Then:
Set-Content –Path “x:\your desired location” –Value $Data

6. Once this is done we need to complete the signing request against your internal certificate authority. I have used the web request of our SubOrdinate for this example. Use the same internal CA as what you used for SSL procurement for your Lync platform!
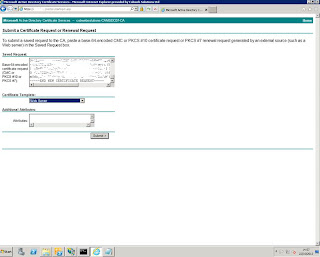
Save the signing request.
7. We now need to complete the signing request using Import-ExchangeCertificate. Information on this cmdlet is available here: http://technet.microsoft.com/en-us/library/bb124424.aspx
“Import-ExchangeCertificate -FileData ([Byte[]]$(Get-Content -Path ‘x:\cert location’ -Encoding byte -ReadCount 0))

The certificate is now installed.
Ensure you do this for all Exchange 2013 Back End Servers.
8. We are now in a place where all our Exchange 2013 Front End Servers have had the necessary configuration via Powershell and ‘Set-OWAVirtualDirectory’, and we have installed Certificates on all our Exchange 2013 Back End servers. We now need to edit a web config file on each Exchange 2013 Back End.
The file we want to modify is the web.config file in the following location “x:\Program Files\Microsoft\Exchange Server\V15\ClientAccess\Owa”. Where x is the drive you installed too.

9. Open the Web Config file and perform a search for “</appsettings>”. This takes you to the end of all App Settings configuration. Add these two lines in:
<add key="IMServerName" value="FQDN of Lync Pool or Director Pool" />
You can see I have commented this out to explain the change I am making.

It is important to note that the thumbprint you enter in each web.config file is the thumbprint of the Certificate you have created on each Back End server.
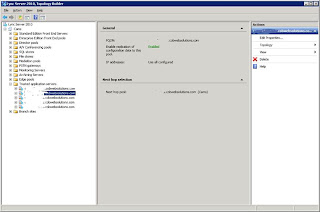
10. Once you have performed this on all Back Ends we need to open the Lync Topology Builder and enter each Back End as a Trusted Application
Add each Exchange 2013 Back End server separately, matching the FQDN of the server and the certificate published for the Back End as the Trusted Application. Add all required Exchange 2013 Back Ends.
Add each Exchange 2013 Back End server separately, matching the FQDN of the server and the certificate published for the Back End as the Trusted Application. Add all required Exchange 2013 Back Ends.

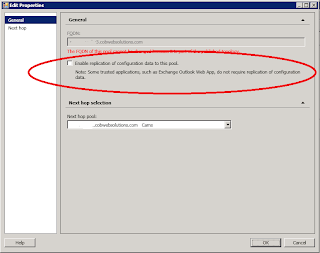
11. Once created you can edit them and remove ‘Enable replication of configuration data to this pool’ as this is not needed for Lync IM integration.

12. Once all have been added Publish the Topology.
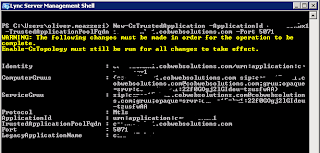
13. We now need to open a Lync Powershell session and perform the following:
New-CsTrustedApplication –ApplicationID “Server Name” –TrustedApplicationPoolFqdn “FQDN of Exchange 2013 Back End server” –Port ‘desired port number’
I Set the ApplicationID as the server name for easy reference. Set the TrustedApplicationPoolFQDN as the FQDN of the Exchange 2013 Back End you are adding. Add a port number that isn’t in use. I normally start at 5070 and work my way up after ensuring they aren’t in use.

14. Once this is done ensure you repeat it for every Exchange 2013 Back End server that you need and indeed published in the Topology Builder in step 11. and 12.
15. Finally we may need to do the following two things to get Lync IM integration working.
The first is to recycle the MSExchangeOWAAppPool on each Exchange 2013 Back End. This is needed to be done only if IM integration is not working in OWA.
The second is to restart IIS on each Exchange 2013 Front End server. This is needed to be done only if IM integration is not working in OWA.
The first is to recycle the MSExchangeOWAAppPool on each Exchange 2013 Back End. This is needed to be done only if IM integration is not working in OWA.
The second is to restart IIS on each Exchange 2013 Front End server. This is needed to be done only if IM integration is not working in OWA.
16. Open OWA. You should now be able to sign in and see this:
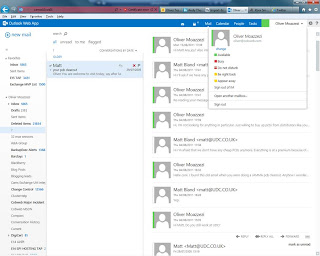
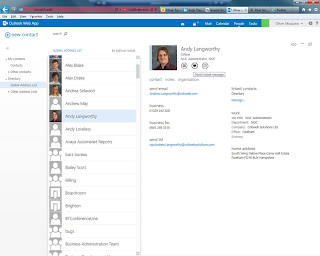
The first thing you’ll notice over Exchange 2010 OWA integration is that the contact list is not shown on the left pane anymore. You have to get it from the People Hub.
If you aren't seeing the above then you may have an OWA Mailbox Policy that isn't allowing IM. Perform in Powershell: Get-OWAMailboxPolicy to confirm against the affected users.
In the event this is the issue, use:
"Set-OWAMailboxPolicy -identity 'OWAMailboxPolicy' -InstantMessagingType OCS" to fix.
That’s it! Take care.

The first thing you’ll notice over Exchange 2010 OWA integration is that the contact list is not shown on the left pane anymore. You have to get it from the People Hub.

If you aren't seeing the above then you may have an OWA Mailbox Policy that isn't allowing IM. Perform in Powershell: Get-OWAMailboxPolicy to confirm against the affected users.
In the event this is the issue, use:
"Set-OWAMailboxPolicy -identity 'OWAMailboxPolicy' -InstantMessagingType OCS" to fix.
That’s it! Take care.
Oliver Moazzezi - MVP Exchange Server


